Chocolate Cake

DSC_0965 (5)

I like to think of this cake as a Super Cake, not a ‘naughty chocolate cake’. With brown rice flour and cacao powder, it has good protein levels and a rich array anti-oxidants and essential nutrients such as potassium and magnesium. Not to mention smuggling apple into the cake!  This is a very versatile cake, which can be made into a cake size or into cup cakes. I have made lots of birthday cakes for the children with this mixture. I also bake a double batch of this each week, making about 40 small cupcakes and freezing them for snacks and lunchboxes.

Ingredients:

  • 4 medium apples (green or red)
  • ¾ cup potato flour
  • 1 cup brown rice flour
  • ¼ cup cacao powder
  • 1 cup caster sugar
  • 1 tsp bicarb soda
  • 1 tsp guar gum
  • 4 eggs of ‘no-egg’ egg replacer and rice or coconut milk as the liquid to make up the ‘no-eggs’ (so, for example: for ‘no-egg’ it is 4 heaped tsp of ‘no-egg’ and 8 Tbs of milk of choice)
  • 1 cup sunflower oil (or your oil of choice)
  • 1 tsp vanilla bean paste

Icing optional (I only ice on special occasions; my children eat these without icing in cupcake size for a lunchbox snack)

  • 1 cup icing sugar mixture or pure icing sugar that is well sifted, or make your own icing sugar in the Thermomix!
  • 1 Tb cacao or cocoa powder (sifted)
  • 2 Tbs apple juice (Nudie – Australia, Innocent – UK, or juice your own apples)

Method:

  1. Preheat oven to 180 degrees (200 degrees if making cupcakes)
  2. Grease and line cake tin of choice. For cupcakes, either grease tin or line with cupcake papers
  3. Sift all dry ingredients together into a large bowl. Add sugar and egg replacer powder into the dry mixture
  4. Peel, core and grate apples, add to the dry mixture
  5. Add oil, vanilla and milk and stir all ingredients together
  6. Leave to settle and absorb for 10 minutes. I find this settling time helps all the flour properly absorb the flour
  7. Pour into cake tin or spoon into cupcake tray/ papers
  8. Bake cake for 45 minutes. Bake cupcakes for 12 minutes
  9. Test cake and turn out onto a wire rack to cool
  10. The cake or cupcakes freeze well

photo (25)


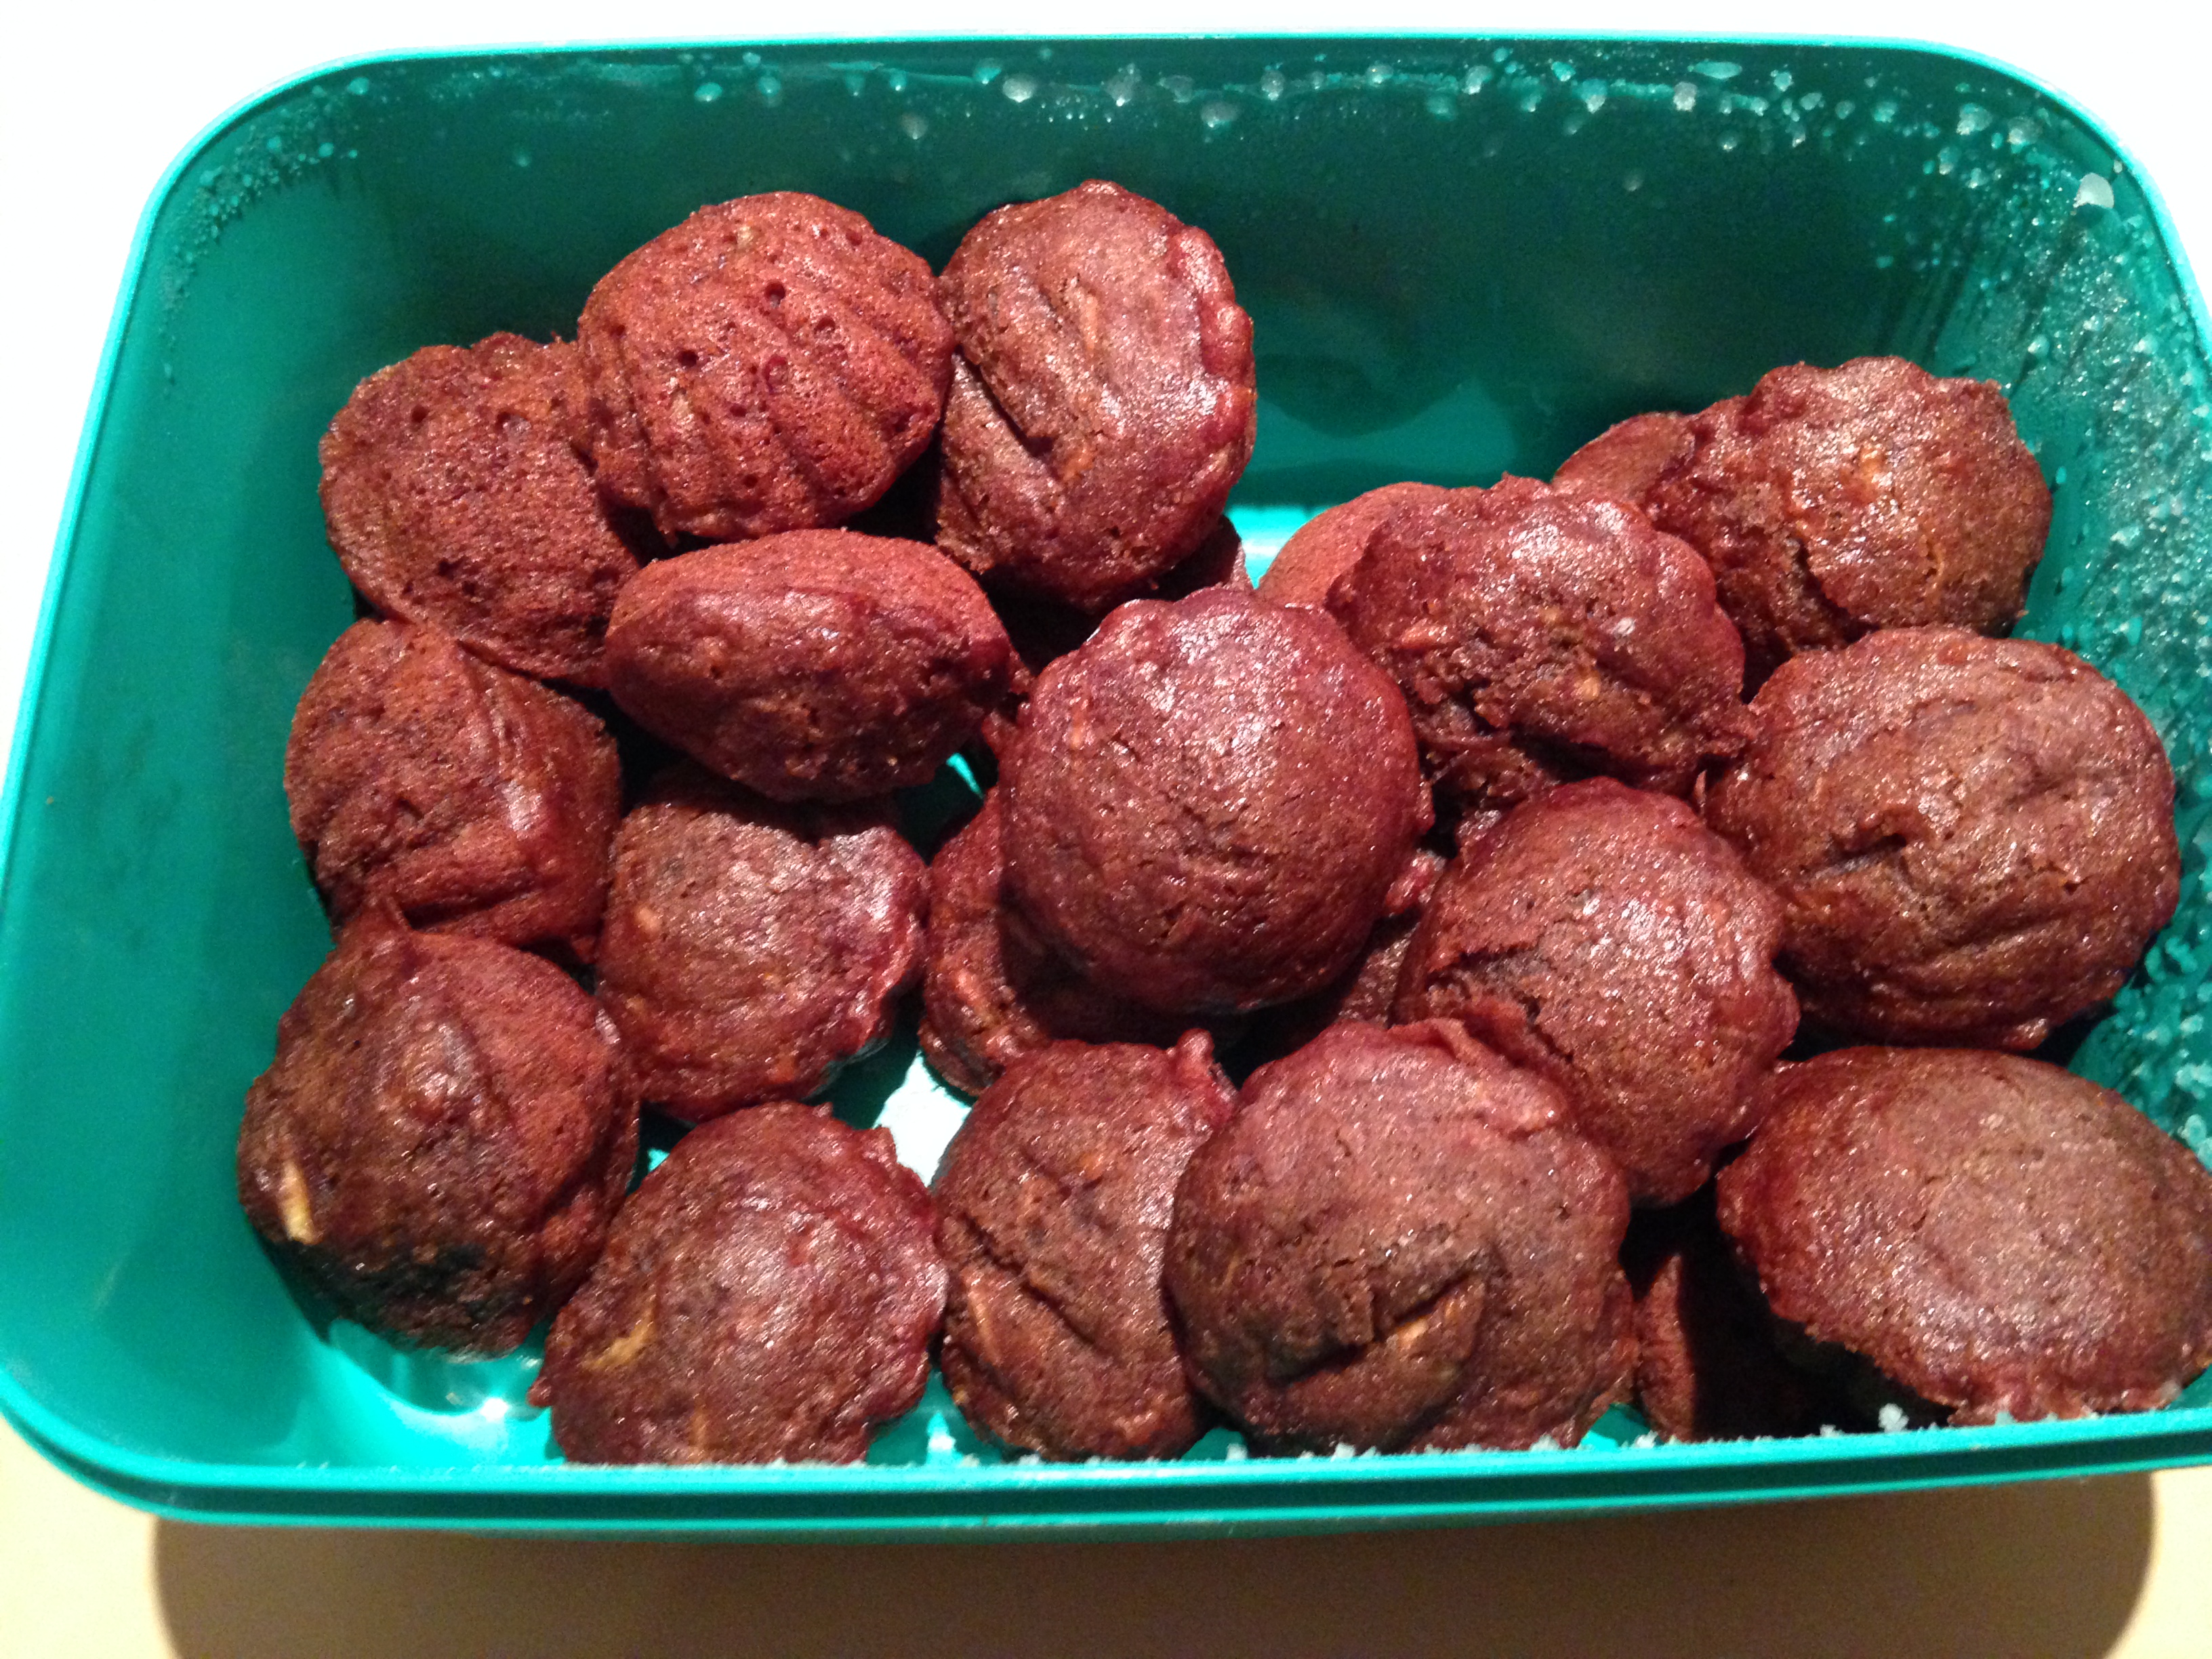
This is my box of cakes in the freezer.  I like to keep it well stocked so I can pull extras out if other children come over for a snack or a cake needs to be sent to school for special occasions.

photo (29)

This is a castle cake that I whipped up quickly on the day of my daughter’s birthday (after a full day out doing fun things). I used a silicone castle cake mould and it was decorated with strawberries and sprinkled with pure icing sugar (fairy magical dust)

If you give this recipe a try please let me know how it turns out, I’m happy to troubleshoot or discuss how you could substitute these ingredients if some of the ones I’ve used aren’t suitable to your family’s sensitivities.

ANZAC Biscuits

DSC_0966 (6)

Anzac Biscuits

We have always celebrated Anzac Day, even when we lived in the UK. My kids have always loved Anzac Biscuits, even my (staunchly English) husband too. So, we make these often but today we made them to remember the Anzac spirit. My Mother-in-Law and Sister-in-Law arrived off the plane today from the UK, so it was great to have some of these fresh out of the oven to welcome them to Australia on this special national remembrance day.

Ingredients:

  • 1 cup Rice flakes (or Quinoa flakes)
  • 1 cup plain flour mix (1/3 cup Tapioca/Arrowroot flour, 1/3 cup White Rice flour,1/3 cup Brown rice flour & 1 teaspoon Guar Gum)
  • 170 g margarine
  • 1 Tb boiling water
  • 2 Tb Golden syrup (or honey or maple syrup or rice syrup)
  • ½ cup sugar
  • ¾ cup desiccated or shredded coconut
  • ½ tsp bicarb soda

Method:

  1. Pre-heat oven to 180 degrees
  2. Line a baking tray with baking paper. Spray with rice bran oil or coconut oil spray if desired
  3. Sift flour into a large mixing bowl, add sugar, coconut, guar gum and make a well in the middle and set aside.
  4. In a saucepan, add margarine, water, golden syrup and rice flakes. Cook over a low heat until melted and smooth. Set aside for 10 minutes.
  5. Return to pan and stir for a further 5 minutes. Remove from heat, add bicarb soda and stir. Then, stir these wet ingredients into the dry mix. Mix to combine all ingredients.
  6. Use a teaspoon or tablespoon (depending on desired size of the biscuit) to scoop mixture, then form a ball in your hands. Flatten ball on the tray using your hand or a fork.
  7. Bake for 20 minutes or until golden
  8. Cool on wire rack
  9. Store in airtight containers. Freezes well and can be added to a lunchbox easily

photo (23)

I pulled some Anzac biscuits out of the freezer at the last minute for my son’s Gruffalo themed birthday party last year and called them ‘Gruffalo Cakes’!

If you give this recipe a try please let me know how it turns out, I’m happy to troubleshoot or discuss how you could substitute these ingredients if some of the ones I’ve used aren’t suitable to your family’s sensitivities.


Crispy Chicken – A Saturday night treat

DSC_0965 (3)

Crispy Chicken

Ingredients:

  • Chicken legs (I do 1 per child and 2 per adult, plus enough for lunch the next day or to slice up and make sushi with)
  • Rice crumbs (3/4 cup for about 8 legs)
  • Egg Replacer (I use Orgran’s ‘No Egg’)
  • Water to mix up the egg replacer with
  • Salt & pepper (I use Himalayan salt)
  • Suitable herbs and spices that your family tolerates (I find here in Australia that the Coles brand of herbs and spices are trace free. I use garlic powder, onion flakes, and dried oregano leaves)

Method:

  1. Prepare a baking paper lined tray by spraying it with oil (I use Rice Bran Oil)
  2. Preheat oven to 180 degrees C
  3. Set up a production line  with the tray at the end for chicken to go straight onto when crumbed. From left to right: chicken legs, egg replacer bowl, rice crumb bowl, tray.
  4. Mix up your egg replacer into a bowl that can be dipped into with a chicken leg. I tend to mix up 2 eggs worth, which for ‘No Egg’ is 2 tsp powder mixed with 4 Tb water
  5. In another bowl that chicken can be dipped into, start with 1 cup of rice crumbs, mix salt and pepper and any herbs or spices into the rice crumbs
  6. Start by rolling each leg in the ‘No Egg’ (cover them well), then roll in the rice crumb mixture (again, cover well), then place on the tray.
  7. Repeat for all the legs. Then spray the legs with oil before baking (I use rice bran oil)
  8. Bake in the oven for 45 Minutes (jacket potatoes need longer than this so pop them in ahead of time)
  9. I make a jacket potato or potato (or sweet potato) wedges that bake at the same time, then serve with a salad.

If you give this recipe a try please let me know how it turns out, I’m happy to troubleshoot or discuss how you could substitute these ingredients if some of the ones I’ve used aren’t suitable to your family’s sensitivities.

Chocolate – a magic word for allergy kids

DSC_0970 (2)         DSC_0977 (2)

Chocolate

Easter in our house is not about chocolate as until last year I had never made it. The kids had some memory of dairy free chocolate from when they were less restrictive and able to have it, but there was a gap when they couldn’t have any at all…until my best friend gave me the courage to research and make my own. I have been making this chocolate for a while now and it’s great to store in the freezer and get out if you need a snack, or to chop finely into a baking project, or even grated and mixed into coconut yogurt as an icing or dollop of ‘cream’ with a yummy cake. This would be a great Easter treat for allergy suffers – a treat the whole family could enjoy.

Ingredients:

  • 160 g coconut oil (I melted the coconut oil before measuring it)
  • 240 g honey (golden syrup or agave nectar, etc)
  • 75 g cacao powder
  • 1/3 tsp vanilla bean paste

Method:

  1. Line a baking tray or slice tin with baking paper (ensuring it goes up the sides so no chocolate escapes)
  2. Place all ingredients into a blender or mix-master and whizz together until smooth
  3. Pour into the tray and lay flat in the freezer for 30-60 minutes (until solid)
  4. Lift baking paper out of the tray onto a chopping board
  5. Either cut into squares, rip the chocolate up, or use small biscuit cutters to make desired shapes
  6. Work quickly and get back in the freezer before it melts! As it’s based on coconut oil it should be stored in the fridge or freezer and taken out to eat
  7. I store in zip-lock bags or other suitable air-tight containers

Thermomix Method:

  1.  Line a baking tray or slice tin with baking paper (ensuring it goes up the sides so no chocolate escapes)
  2. Place all ingredients into the bowl
  3. Mix for 20 seconds on speed 1 and then scrape down
  4. Mix at 37 degrees, for 20 seconds, on speed 4, and scrape down.
  5. Repeat until mixture is smooth
  6. Pour into the tray and lay flat in the freezer for 30-60 minutes (until solid)
  7. Lift baking paper out of the tray onto a chopping board
  8. Either cut into squares, rip the chocolate up, or use small biscuit cutters to make desired shapes
  9. Work quickly and get back in the freezer before it melts! As it’s based on coconut oil it should be stored in the fridge or freezer and taken out to eat
  10. I store in zip-lock bags or other suitable air-tight containers

Please met me know what you think & share this post with friends or family that are allergy sufferers.


Pancakes!

DSC_0965

Easter Saturday morning surprise for the family – Pancakes! I have finally mastered this recipe so that I can reliably whip them up quickly any day for breakfast, then keep them cold for an afternoon snack (lunch box idea) or a cold breakfast treat the next day. I have to say with my new Thermomix I can make this in a matter of moments. On the downside, my son now knows he can ask for pancakes and get them pronto! I’m just happy they can have such a yummy breakfast that I know is full of goodness. My son eats them straight out of the pan, but my daughter likes them with margarine and jam. Whichever topping you choose, just ensure it is allergen safe, too. My favourite topping so far is chopped banana and honey. I have written the ingredients list using grams so that either the regular method or Thermomix method can be used.

Pancakes

Ingredients:

  • 60 g white rice flour
  • 60 g brown rice flour
  • 40 g tapioca/arrowroot flour
  • 360 g (1.5 cups) of rice milk (or coconut, or prescription formula, etc) [I use calcium rich milk]
  • 1 Tb Golden syrup (or honey or maple syrup or rice syrup)
  • 1 tsp guar gum
  •  1.5 tsp baking powder

Method:

  1. Whisk all ingredients together
  2. Add additional milk if needed to make it up to the consistency you like
  3. I use margarine in a non-stick electric frying pan and cook over a medium heat

Thermomix Method:

  1. Place all ingredients in the bowl.
  2. Mix on speed 2 for 20 seconds, scrape down
  3. Reverse mix on speed 4 for 15 seconds
  4. Add additional milk if needed to make it up to the consistency you like
  5. I use margarine in a non-stick electric frying pan and cook over a medium heat

If you give this recipe a try please let me know how it turns out, I’m happy to troubleshoot or discuss how you could substitute these ingredients if some of the ones I’ve used aren’t suitable to your family’s sensitivities. For example, if your family doesn’t tolerate rice, then other flours could be tried, such as: millet, sorghum or quinoa. If the arrowroot isn’t suitable, another starchy flour is potato.


Good Friday Hot Cross Buns

DSC_0963 (2)

Today, we started an exciting tradition in our house – Good Friday Hot Cross Bun making and eating! I’ve always found Hot Cross Buns too scary to try on our restrictive diets, but this year I was brave (while holding my breath that it would all turn out and be delicious). I took inspiration from several recipes, tweaked, re-adjusted and came up with a final working mixture. I have just sat down and had a bun myself with a nice cup of green tea, and it was all I’d hoped it would be to get our annual Good Friday Hot Cross Bun bake session off to a great start. I have written the ingredients list using grams so that either the regular method or Thermomix method can be used.

Hot Cross Buns

Ingredients:

Dough

  • 310 g warm water
  • 1 Tb yeast
  • 1 tsp honey (can use golden syrup, rice syrup or maple syrup)
  • 2 Tb honey (can use golden syrup, rice syrup or maple syrup)
  • 270 g white rice flour
  • 120 g brown rice flour
  • 120 g tapioca/arrowroot flour
  • 1.5 tsp guar gum
  • 1 tsp salt
  • 3 Tb sunflower oil (your choice of oil)

Crosses

  • 1/4 cup white rice flour
  • 1/4 cup water

Glaze

  • 1/4 cup sugar (or honey, maple syrup golden syrup, or rice syrup)
  • 1/4 cup water

Method:

  1. I  pre-heat oven to 150 degrees then turn off (ready for dough to rise in a nice warm place)
  2. Oil a square cake tin
  3. Combine warm water, yeast and 1 tsp honey and let the yeast froth up (set aside about 10min)
  4. Meanwhile, measure the dry ingredients into a large mixing bowl and stir to combine together.
  5. Mix the crosses mixture together. I placed this in a zip-lock bag ready to pipe when ready
  6. When yeast has frothed, add the 2 Tbs honey and the sunflower oil into the yeast and water mixture.
  7. Then pour the wet mixture into the dry mixture, stir until combined.
  8. Turn out onto a floured mat or chopping board to knead (I use white rice flour to flour the board)
  9. Knead the dough until it has combined nicely, I add extra rice flour to get it to a nice dough consistency.
  10. Roll into balls (I made 9 buns that I laid side by side in the square tin, then pressed down gently)
  11. Pipe a cross on each bun (I cut a small amount of the corner of the zip-lock bag and used it to pipe with)
  12. Place in the pre-warmed oven to rise until the balls have doubled
  13. Bake on 200 degrees for 40 minutes
  14. Make sugar glaze up when there is 10 minutes baking time left. To make glaze, place ingredients in a small saucepan, bring to the boil (while stirring), then reduce to simmer for 5 minutes
  15. Cool on wire rack. Glaze while still hot. Once cooled enough to pull apart into buns, you can glazed the sides of each bun too for extra sweetness!

Thermomix Method:

  1. I  pre-heat oven to 150 degrees then turn off (ready for dough to rise in a nice warm place)
  2. Oil a square cake tin
  3. You can grind your rice into flour or use flour you have already ground. To grind flour place brown and white rice into the bowl for 1 minute on speed 9. Set flour aside.
  4. Place water and the 1 tsp of honey into the bowl. Combine at 37 degrees, speed 1 for 5 minutes to heat the water
  5. Add the yeast, mix on speed 1 for 30 seconds.
  6. Leave 10 minutes for the yeast to proof and froth up
  7. Add the oil and the 2 Tb of honey, then place all dry ingredients into the bowl. Mix on speed 1 for 20 seconds, scrap down and repeat
  8. Knead with closed lid for 2 minutes
  9. Turn out onto a floured mat or chopping board (I use white rice flour to flour the board)
  10. I sprinkled the dough with flour and gave it a quick knead
  11. Roll into balls (I made 9 buns that I laid side by side in the square tin, then pressed down gently)
  12. Pipe a cross on each bun (I cut a small amount of the corner of the zip-lock bag and used it to pipe with)
  13. Place in the pre-warmed oven to rise until the balls have doubled
  14. Bake on 200 degrees for 40 minutes
  15. Make sugar glaze up when there is 10 minutes baking time left. To make glaze, place ingredients in a small saucepan, bring to the boil (while stirring), then reduce to simmer for 5 minutes
  16. Cool on wire rack. Glaze while still hot. Once cooled enough to pull apart into buns, you can glazed the sides of each bun too for extra sweetness!

This recipe is very pure in its ingredients as my children are very sensitive. However, I am hoping to try and make a more adult version of this recipe tomorrow (for us grown ups who are less sensitive). I will be adding a sprinkle of mixed spice and some chopped up mixed dried fruit.

If you give this recipe a try please let me know how it turns out, I’m happy to troubleshoot or discuss how you could substitute these ingredients if some of the ones I’ve used aren’t suitable to your family’s sensitivities. For example, if your family doesn’t tolerate rice, then other flours could be tried, such as: millet, sorghum or quinoa. If the arrowroot isn’t suitable, another starchy flour is potato.