Cottage Pie

photo (27)

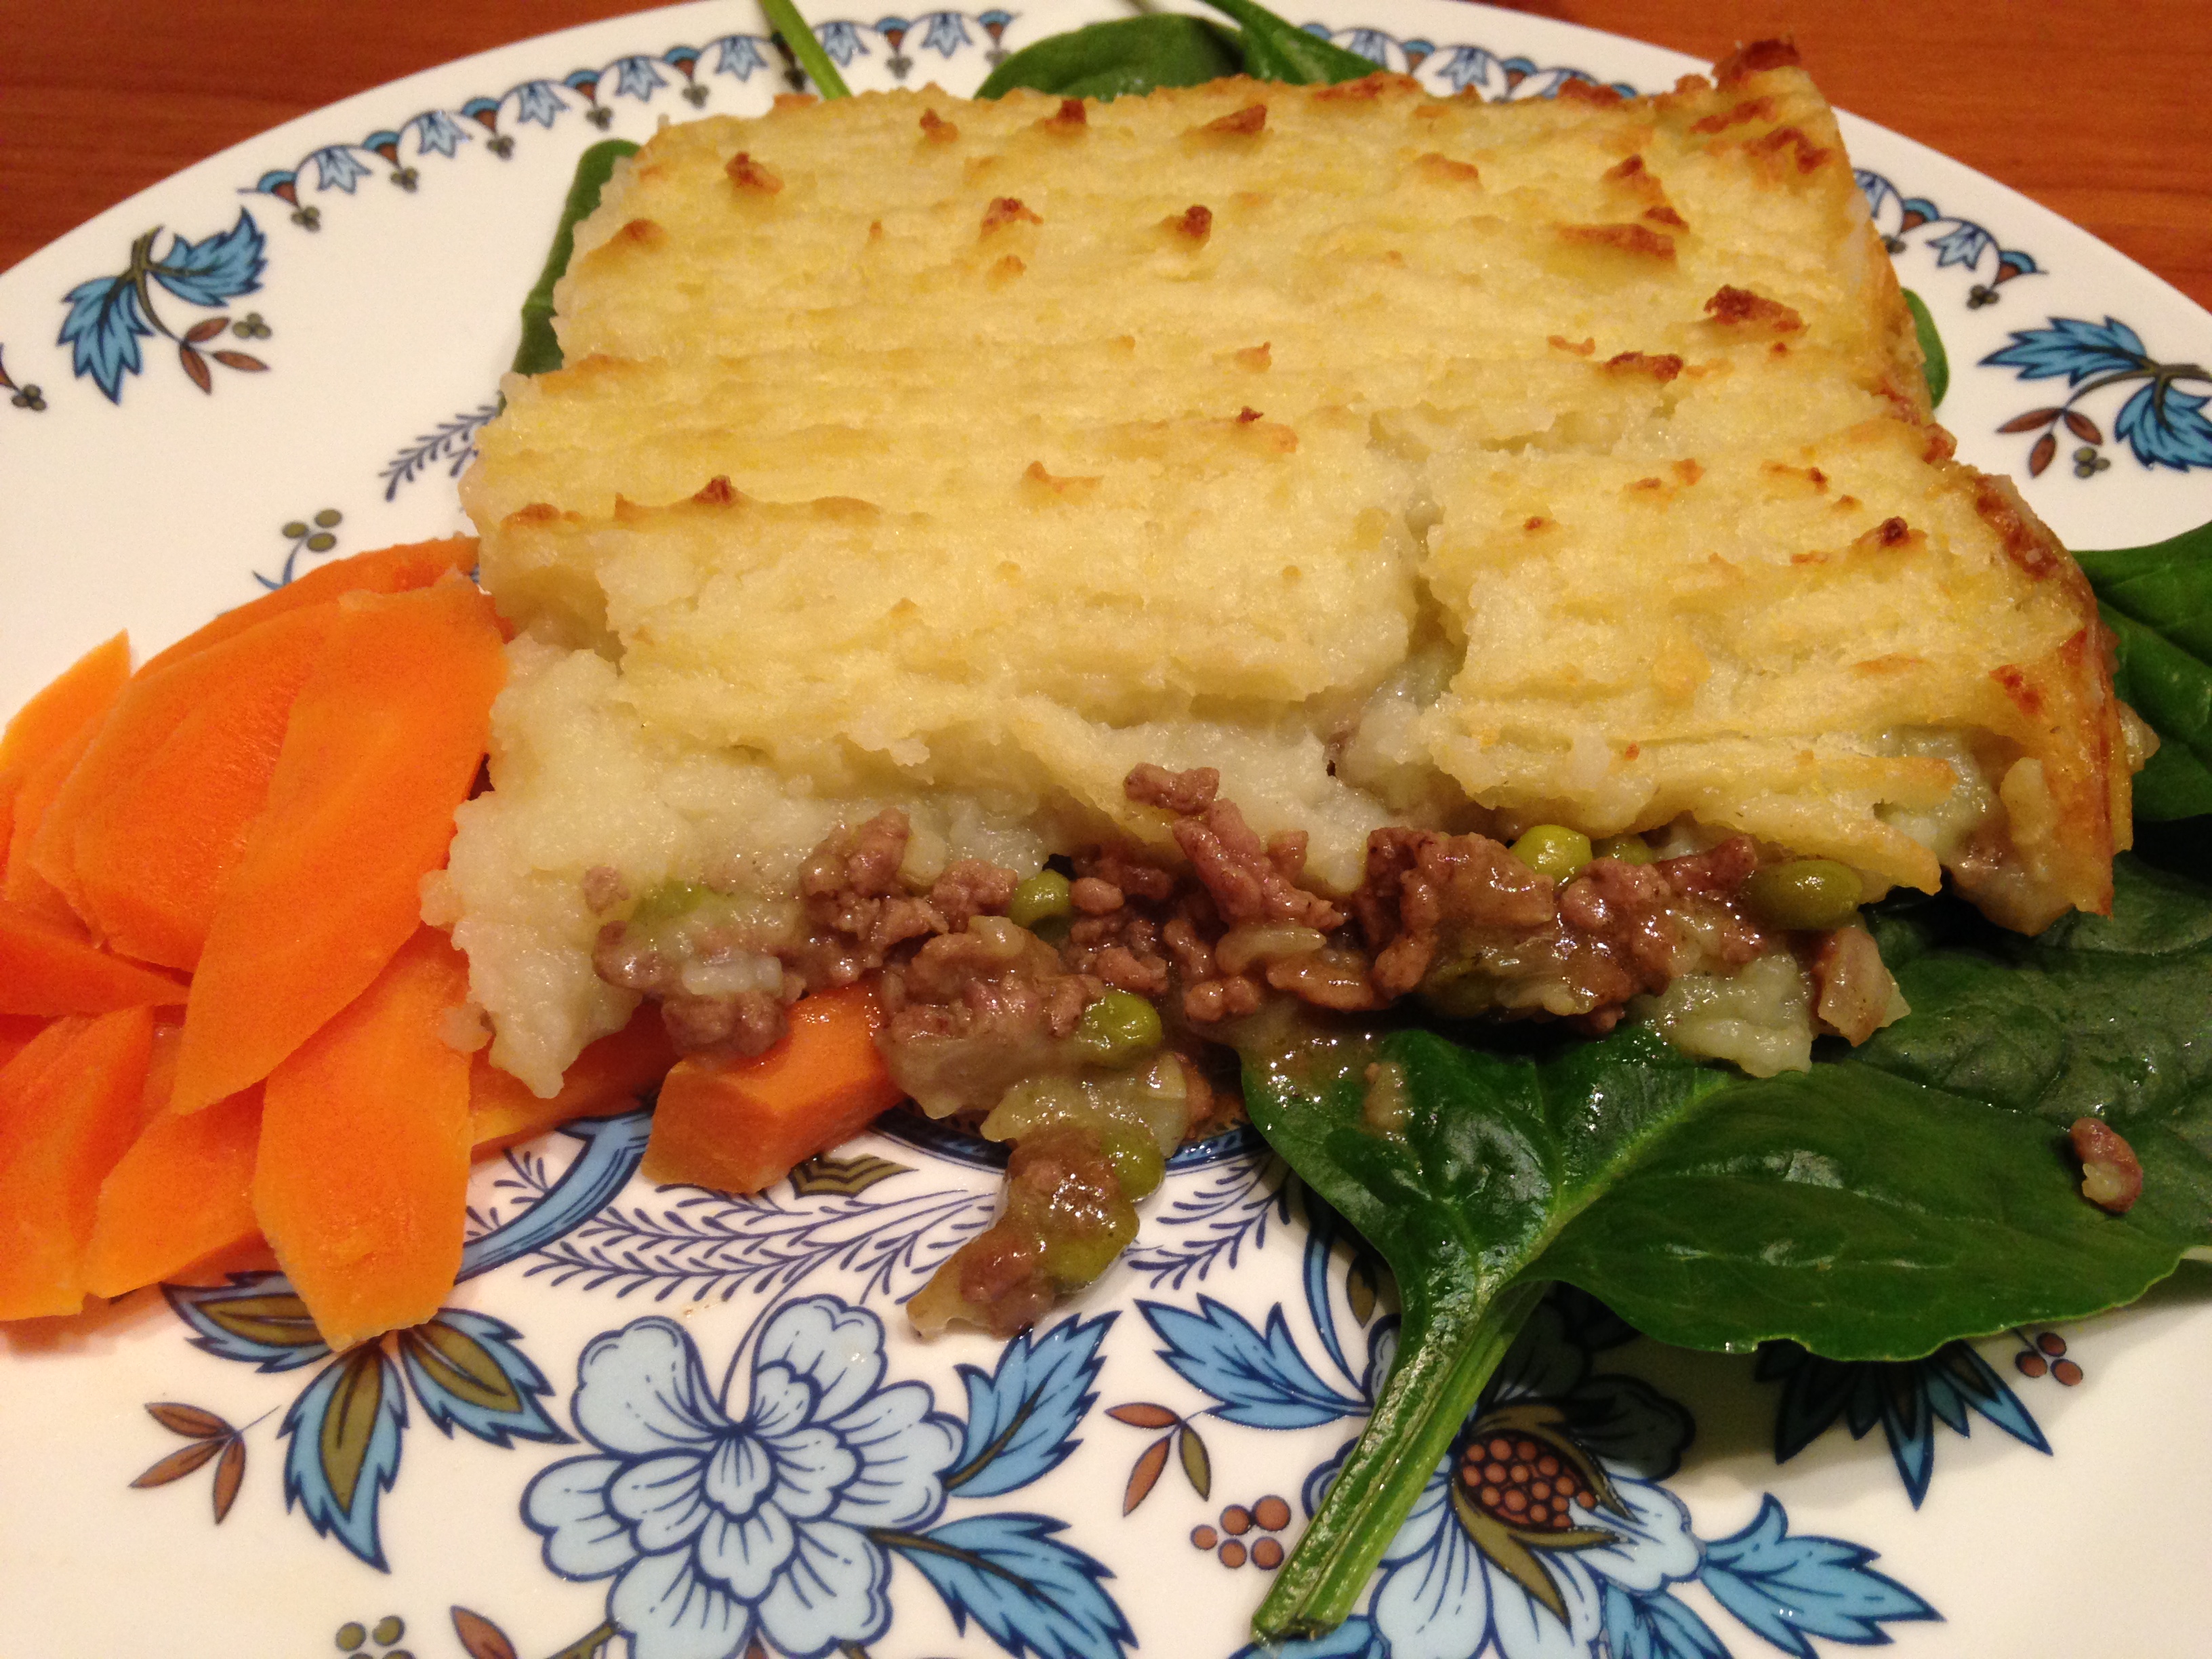
We have Cottage Pie once a week. It can easily become a Shepard’s Pie if you use lamb mince instead of the beef. It is such a great meal that works well for left overs or frozen ready meals. My daughter has not been wanting cooked carrot recently so we just had it with peas this time and had the carrots steamed on the side and served the pie on a bed of baby spinach. It is a great meal as you can load it up with lots of vegetables and adapt it to suit different likes and dietary requirements.

Ingredients:

  • 500g beef mince
  • 1kg potatoes
  • 375-500ml stock
  • 1-2 tbs tapioca flour
  • 1 carrot
  • ½ cup frozen peas
  • Ground pepper
  • 1-2 clove garlic (minced)
  • Oregano (or other safe dried herbs)
  • 1 onion
  • Margarine (up to 3 Tbs)
  • Suitable milk (as much as needed to make a creamy mash potato)

Method:

  1. Peel and chop the potatoes so these can steam (microwave or stove top) while the beef mixture cooks.
  2. Finely dice onion and mince garlic
  3. Heat oil of choice in frying pan (I used spray rice-bran oil)
  4. Add onions to the pan and soften/brown. Add garlic for 1 min before adding beef mince.
  5. Fry beef mince until cooked
  6. Grate carrot or finely chop (depending on your preference). Add to pan, cover and steam for a few minutes
  7. Add frozen peas and stir
  8. Add tapioca flour and coat the beef mixture (I added about 1 Tb this time)
  9. Add stock (I added about 500 ml this time)
  10. Simmer until desired consistency. Add more stock or tapioca flour to achieve a nice gravy sauce consistency so the pie isn’t too dry. A tip if adding flour after the liquid is added, mix flour with a small amount of water to make a paste before adding it.
  11.  Drain and mash potatoes, add margarine (I used about 3 Tbs) and milk (coconut milk or rice milk) until a creamy mash has been achieved
  12. Add beef mixture to a casserole dish, layer and spread mashed potato over the top. I used a fork to scrape a texture on the top of the pie – I find this makes the pie top brown and flavor nicely.
  13. Bake for 45 minutes
  14. Serve with steamed vegetables or a side salad
  15. This recipe is great portioned up and frozen as ready meals. I make sure I send one each day to my daughter’s daycare as her hot meal of the day.

If you give this recipe a try please let me know how it turns out, I’m happy to troubleshoot or discuss how you could substitute these ingredients if some of the ones I’ve used aren’t suitable to your family’s sensitivities.

Advertisement

Mid-Week Italian Inspired

Image

So it was the middle of the week last night, but I fancied trying a new dish! I have found that since we have been on an allergy diet we haven’t eaten as many Italian foods – usually there is so much wheat and dairy involved! But I am doing more research into  Italian dishes that could be adapted. I was interested to learn that the Cannellini bean in Italian foods originated in Tuscany; so this dish is inspired by that region of Italy. I adapted several recipes to make this safe and still yummy – the husband gave it 9/10. I served this meal with basmati rice, but it would work with quinoa or pasta as well. It was nice with some green vegetables on the side, we had Buk Choy (just lightly steamed), but green beans, steamed asparagus or broccolli would work nicely too. I have saved some leftovers to add to salads. I’m looking forward to adapting more Italian recipes in the future.

Ingredients:

  • Approximately 8 chicken thighs
  • 1 can of cannellini beans (rinsed and drained)
  • 1 can of chopped tomatoes
  • 1 punnet of cherry tomatoes
  • 1 cup of stock (I used frozen chicken stock that was very hearty)
  • 1 red capsicum (sliced)
  • 2 sprigs of fresh rosemary (of substitute with suitable dried herbs)
  • 2 sprigs of fresh thyme (of substitute with suitable dried herbs)
  • 2 cloves of garlic (finely minced)
  • Grated zest of 1 lemon
  • Olive oil
  • Salt and Pepper (I use Himalayan salt)
  • 1 Tb arrowroot/tapioca flour and enough water to make it into a paste (to use if the sauce needs thickening)

Method:

  1. Preheat oven to 200 degrees Celsius
  2. Add the cannellini beans, chopped tomatoes, cherry tomatoes, capsicum and stock to the roasting pan
  3. Place chicken thighs in the roasting pan
  4. Drizzle the chicken thighs with olive oil, then sprinkle the herbs, salt and pepper, and lemon rind on them
  5. Add extra herbs and garlic to the bean mixture if desired
  6. Cook for 45 minutes
  7. I thickened my sauce with the arrowroot flour and water mixture
  8. I served this meal with steamed basmati rice and lightly steamed Buk Choy

If you give this recipe a try please let me know how it turns out, I’m happy to troubleshoot or discuss how you could substitute these ingredients if some of the ones I’ve used aren’t suitable to your family’s sensitivities.

Saturday Night Burgers

photo 2 photo 3

It was burger night in our house tonight and EVERYONE was happy! I had to whip up the BBQ sauce first (Please see that recipe before beginning this one) but then the meal was very quick and easy. We tend to serve our burger patties in lettuce cups (iceberg works best for this), with a side salad, and either a jacket potato, hot chips or crisps/chips.

Ingredients:

  •  500g beef mince
  • 1/4 cup rice crumbs
  • 1 egg replaced (I mixed 1 portion of  ‘no-egg’)
  • 1 Tb of my BBQ sauce (see other post)
  • A sprinkle of garlic granules and onion flakes
  • A sprinkle of suitable dried herbs (oregano is safe for us all so I used that)
  • Salt & pepper to taste (I use Himalayan salt)

Method:

  1. Place mince and all ingredients into a mixing bowl (I mix up the ‘no-egg’ before adding to the mix)
  2. Using your clean hands, mix all the mixture together until well combined
  3. Divide the mixture up into six medium sized portions
  4. Form a ball with each portion and mould it into a pattie shape
  5. Place the patties on a plate and refrigerate for at least 30 minutes (I find this helps them retain their shape during cooking)
  6. Cook the patties in an oiled frying pan, electric frying pan, or on the BBQ
  7. Serve with a drizzle of the BBQ sauce
  8. Refrigerate any leftover patties – they are great as leftovers or chopped up cold in salads the next day

If you give this recipe a try please let me know how it turns out, I’m happy to troubleshoot or discuss how you could substitute these ingredients if some of the ones I’ve used aren’t suitable to your family’s sensitivities.

BBQ Sauce – ‘Dark Sauce’

Image

I was devastated when I realised corn was in EVERYTHING!!!! I don’t want our family to miss out on all the yummy sauces in the world, so I have set myself a challenge to gradually make them all suitable. This is my daughter’s favourite to go with sausages or burgers. It is a BBQ sauce but she has taken to calling it the ‘Dark Sauce’ – the name has stuck. I had to make up a batch of this sauce today as our stock in the fridge had run dry. I was planning on making burgers for dinner and always add some sauce into them to make them extra delicious. I will blog the burgers next…

Ingredients:

  • 200g tomato paste
  • 1 Tb coconut oil
  • ½ cup apple cider vinegar
  • 2 Tbs Molasses
  • ½ cup golden syrup (or honey or maple syrup)
  • A sprinkle of ground salt (I use Himalayan salt)
  • A sprinkle of garlic and onion powder

Method:

  1. Melt coconut oil in a medium size saucepan
  2. Add remaining ingredients
  3. Stir over a medium to low heat for 7-10 minutes (until it is the thickness you would like it)
  4. Store in a glass jar or bottle. I use a passata bottle as it has a wide enough neck to be able to scrape out the end of the sauce but still be able to pour like a sauce bottle
  5. Store in the fridge

If you give this recipe a try please let me know how it turns out, I’m happy to troubleshoot or discuss how you could substitute these ingredients if some of the ones I’ve used aren’t suitable to your family’s sensitivities.

Shortbread

ImageImage

My stock of shortbread has run out in the freezer – DISASTER!! I used my last ones as a base for a free-from cheesecake (which I can share the recipe for) and now, we have friends coming over for coffee tomorrow and no quick snacks to whip out for the adults and the kids, too. So, today, the daughter and I had a baking session. We made one batch of regular shortbread, which she calls ‘the yellow ones’ and a chocolate version – which is her favourite…one poor mermaid biscuit barely made it to be fully cooled before being gobbled up!

I’m always collecting new biscuit cutters to make our biscuits stay interesting, despite us making them so often. I got the northern hemisphere animals cutters from Ikea last Christmas and they have been a huge hit. The magical, sea, horse, and fairy ones I have collected locally from cake decorating shops and homeware shops. My son has trains, cars and planes as his preferred shapes…but I think this ‘Room on the Broom’ style magic wand will entice him. Let me know how you get on with the recipe. I’m sure other flours such as buckwheat and millet could be used instead of the rice flours; also, if tapioca is a problem then perhaps try potato flour.

Ingredients:

  • 100g white rice flour
  • 100g brown rice flour
  • 80g tapioca flour/arrowroot flour
  • 1 tsp guar gum
  • 90g caster sugar
  • 185g suitable margarine
  • Some raw sugar to sprinkle over the biscuits before baking

Method:

  1. Line baking tray with baking paper & spray with oil (rice bran oil or olive oil – be sure to check they are allergen free)
  2. Add sifted flour, guar gum and sugar into a large bowl and stir through                                                                                           – Optional extra (put 1-2 Tablespoons of Cacao powder into the flour mix to make chocolate shortbread – my daughter loves this variety)
  3. Add margarine and rub through with your fingers until mixture can be squeezed together to form a ball (adjust with a sprinkle more flour if too sticky)
  4. Flour a chopping board or pastry mat with a sprinkle of white rice flour
  5. I use my fingers and palms to push this mixture out flat onto a floured soft plastic chopping board. Cut out desired shapes and place on tray for baking.                                                                                                                                                                   – Optional extra – sprinkle with raw sugar before baking if you desire sugar coated biscuits
  1. Bake in oven (180 degrees Celsius fan forced) for 12 – 15 minutes (depending on how small you cut your biscuits, smaller shapes will cook quicker)
  2. Leave to cool of the tray for 5-10 minutes before transferring to a wire rack to finish the cooling process (if you move them too quickly they can break)
  3. Store in airtight containers. These biscuits freeze well and make a great addition to a spontaneous coffee afternoon or lunchboxes.

If you give this recipe a try please let me know how it turns out, I’m happy to troubleshoot or discuss how you could substitute these ingredients if some of the ones I’ve used aren’t suitable to your family’s sensitivities.

Chocolate Cake

DSC_0965 (5)

I like to think of this cake as a Super Cake, not a ‘naughty chocolate cake’. With brown rice flour and cacao powder, it has good protein levels and a rich array anti-oxidants and essential nutrients such as potassium and magnesium. Not to mention smuggling apple into the cake!  This is a very versatile cake, which can be made into a cake size or into cup cakes. I have made lots of birthday cakes for the children with this mixture. I also bake a double batch of this each week, making about 40 small cupcakes and freezing them for snacks and lunchboxes.

Ingredients:

  • 4 medium apples (green or red)
  • ¾ cup potato flour
  • 1 cup brown rice flour
  • ¼ cup cacao powder
  • 1 cup caster sugar
  • 1 tsp bicarb soda
  • 1 tsp guar gum
  • 4 eggs of ‘no-egg’ egg replacer and rice or coconut milk as the liquid to make up the ‘no-eggs’ (so, for example: for ‘no-egg’ it is 4 heaped tsp of ‘no-egg’ and 8 Tbs of milk of choice)
  • 1 cup sunflower oil (or your oil of choice)
  • 1 tsp vanilla bean paste

Icing optional (I only ice on special occasions; my children eat these without icing in cupcake size for a lunchbox snack)

  • 1 cup icing sugar mixture or pure icing sugar that is well sifted, or make your own icing sugar in the Thermomix!
  • 1 Tb cacao or cocoa powder (sifted)
  • 2 Tbs apple juice (Nudie – Australia, Innocent – UK, or juice your own apples)

Method:

  1. Preheat oven to 180 degrees (200 degrees if making cupcakes)
  2. Grease and line cake tin of choice. For cupcakes, either grease tin or line with cupcake papers
  3. Sift all dry ingredients together into a large bowl. Add sugar and egg replacer powder into the dry mixture
  4. Peel, core and grate apples, add to the dry mixture
  5. Add oil, vanilla and milk and stir all ingredients together
  6. Leave to settle and absorb for 10 minutes. I find this settling time helps all the flour properly absorb the flour
  7. Pour into cake tin or spoon into cupcake tray/ papers
  8. Bake cake for 45 minutes. Bake cupcakes for 12 minutes
  9. Test cake and turn out onto a wire rack to cool
  10. The cake or cupcakes freeze well

photo (25)


This is my box of cakes in the freezer.  I like to keep it well stocked so I can pull extras out if other children come over for a snack or a cake needs to be sent to school for special occasions.

photo (29)

This is a castle cake that I whipped up quickly on the day of my daughter’s birthday (after a full day out doing fun things). I used a silicone castle cake mould and it was decorated with strawberries and sprinkled with pure icing sugar (fairy magical dust)

If you give this recipe a try please let me know how it turns out, I’m happy to troubleshoot or discuss how you could substitute these ingredients if some of the ones I’ve used aren’t suitable to your family’s sensitivities.

ANZAC Biscuits

DSC_0966 (6)

Anzac Biscuits

We have always celebrated Anzac Day, even when we lived in the UK. My kids have always loved Anzac Biscuits, even my (staunchly English) husband too. So, we make these often but today we made them to remember the Anzac spirit. My Mother-in-Law and Sister-in-Law arrived off the plane today from the UK, so it was great to have some of these fresh out of the oven to welcome them to Australia on this special national remembrance day.

Ingredients:

  • 1 cup Rice flakes (or Quinoa flakes)
  • 1 cup plain flour mix (1/3 cup Tapioca/Arrowroot flour, 1/3 cup White Rice flour,1/3 cup Brown rice flour & 1 teaspoon Guar Gum)
  • 170 g margarine
  • 1 Tb boiling water
  • 2 Tb Golden syrup (or honey or maple syrup or rice syrup)
  • ½ cup sugar
  • ¾ cup desiccated or shredded coconut
  • ½ tsp bicarb soda

Method:

  1. Pre-heat oven to 180 degrees
  2. Line a baking tray with baking paper. Spray with rice bran oil or coconut oil spray if desired
  3. Sift flour into a large mixing bowl, add sugar, coconut, guar gum and make a well in the middle and set aside.
  4. In a saucepan, add margarine, water, golden syrup and rice flakes. Cook over a low heat until melted and smooth. Set aside for 10 minutes.
  5. Return to pan and stir for a further 5 minutes. Remove from heat, add bicarb soda and stir. Then, stir these wet ingredients into the dry mix. Mix to combine all ingredients.
  6. Use a teaspoon or tablespoon (depending on desired size of the biscuit) to scoop mixture, then form a ball in your hands. Flatten ball on the tray using your hand or a fork.
  7. Bake for 20 minutes or until golden
  8. Cool on wire rack
  9. Store in airtight containers. Freezes well and can be added to a lunchbox easily

photo (23)

I pulled some Anzac biscuits out of the freezer at the last minute for my son’s Gruffalo themed birthday party last year and called them ‘Gruffalo Cakes’!

If you give this recipe a try please let me know how it turns out, I’m happy to troubleshoot or discuss how you could substitute these ingredients if some of the ones I’ve used aren’t suitable to your family’s sensitivities.


Crispy Chicken – A Saturday night treat

DSC_0965 (3)

Crispy Chicken

Ingredients:

  • Chicken legs (I do 1 per child and 2 per adult, plus enough for lunch the next day or to slice up and make sushi with)
  • Rice crumbs (3/4 cup for about 8 legs)
  • Egg Replacer (I use Orgran’s ‘No Egg’)
  • Water to mix up the egg replacer with
  • Salt & pepper (I use Himalayan salt)
  • Suitable herbs and spices that your family tolerates (I find here in Australia that the Coles brand of herbs and spices are trace free. I use garlic powder, onion flakes, and dried oregano leaves)

Method:

  1. Prepare a baking paper lined tray by spraying it with oil (I use Rice Bran Oil)
  2. Preheat oven to 180 degrees C
  3. Set up a production line  with the tray at the end for chicken to go straight onto when crumbed. From left to right: chicken legs, egg replacer bowl, rice crumb bowl, tray.
  4. Mix up your egg replacer into a bowl that can be dipped into with a chicken leg. I tend to mix up 2 eggs worth, which for ‘No Egg’ is 2 tsp powder mixed with 4 Tb water
  5. In another bowl that chicken can be dipped into, start with 1 cup of rice crumbs, mix salt and pepper and any herbs or spices into the rice crumbs
  6. Start by rolling each leg in the ‘No Egg’ (cover them well), then roll in the rice crumb mixture (again, cover well), then place on the tray.
  7. Repeat for all the legs. Then spray the legs with oil before baking (I use rice bran oil)
  8. Bake in the oven for 45 Minutes (jacket potatoes need longer than this so pop them in ahead of time)
  9. I make a jacket potato or potato (or sweet potato) wedges that bake at the same time, then serve with a salad.

If you give this recipe a try please let me know how it turns out, I’m happy to troubleshoot or discuss how you could substitute these ingredients if some of the ones I’ve used aren’t suitable to your family’s sensitivities.

Chocolate – a magic word for allergy kids

DSC_0970 (2)         DSC_0977 (2)

Chocolate

Easter in our house is not about chocolate as until last year I had never made it. The kids had some memory of dairy free chocolate from when they were less restrictive and able to have it, but there was a gap when they couldn’t have any at all…until my best friend gave me the courage to research and make my own. I have been making this chocolate for a while now and it’s great to store in the freezer and get out if you need a snack, or to chop finely into a baking project, or even grated and mixed into coconut yogurt as an icing or dollop of ‘cream’ with a yummy cake. This would be a great Easter treat for allergy suffers – a treat the whole family could enjoy.

Ingredients:

  • 160 g coconut oil (I melted the coconut oil before measuring it)
  • 240 g honey (golden syrup or agave nectar, etc)
  • 75 g cacao powder
  • 1/3 tsp vanilla bean paste

Method:

  1. Line a baking tray or slice tin with baking paper (ensuring it goes up the sides so no chocolate escapes)
  2. Place all ingredients into a blender or mix-master and whizz together until smooth
  3. Pour into the tray and lay flat in the freezer for 30-60 minutes (until solid)
  4. Lift baking paper out of the tray onto a chopping board
  5. Either cut into squares, rip the chocolate up, or use small biscuit cutters to make desired shapes
  6. Work quickly and get back in the freezer before it melts! As it’s based on coconut oil it should be stored in the fridge or freezer and taken out to eat
  7. I store in zip-lock bags or other suitable air-tight containers

Thermomix Method:

  1.  Line a baking tray or slice tin with baking paper (ensuring it goes up the sides so no chocolate escapes)
  2. Place all ingredients into the bowl
  3. Mix for 20 seconds on speed 1 and then scrape down
  4. Mix at 37 degrees, for 20 seconds, on speed 4, and scrape down.
  5. Repeat until mixture is smooth
  6. Pour into the tray and lay flat in the freezer for 30-60 minutes (until solid)
  7. Lift baking paper out of the tray onto a chopping board
  8. Either cut into squares, rip the chocolate up, or use small biscuit cutters to make desired shapes
  9. Work quickly and get back in the freezer before it melts! As it’s based on coconut oil it should be stored in the fridge or freezer and taken out to eat
  10. I store in zip-lock bags or other suitable air-tight containers

Please met me know what you think & share this post with friends or family that are allergy sufferers.


Pancakes!

DSC_0965

Easter Saturday morning surprise for the family – Pancakes! I have finally mastered this recipe so that I can reliably whip them up quickly any day for breakfast, then keep them cold for an afternoon snack (lunch box idea) or a cold breakfast treat the next day. I have to say with my new Thermomix I can make this in a matter of moments. On the downside, my son now knows he can ask for pancakes and get them pronto! I’m just happy they can have such a yummy breakfast that I know is full of goodness. My son eats them straight out of the pan, but my daughter likes them with margarine and jam. Whichever topping you choose, just ensure it is allergen safe, too. My favourite topping so far is chopped banana and honey. I have written the ingredients list using grams so that either the regular method or Thermomix method can be used.

Pancakes

Ingredients:

  • 60 g white rice flour
  • 60 g brown rice flour
  • 40 g tapioca/arrowroot flour
  • 360 g (1.5 cups) of rice milk (or coconut, or prescription formula, etc) [I use calcium rich milk]
  • 1 Tb Golden syrup (or honey or maple syrup or rice syrup)
  • 1 tsp guar gum
  •  1.5 tsp baking powder

Method:

  1. Whisk all ingredients together
  2. Add additional milk if needed to make it up to the consistency you like
  3. I use margarine in a non-stick electric frying pan and cook over a medium heat

Thermomix Method:

  1. Place all ingredients in the bowl.
  2. Mix on speed 2 for 20 seconds, scrape down
  3. Reverse mix on speed 4 for 15 seconds
  4. Add additional milk if needed to make it up to the consistency you like
  5. I use margarine in a non-stick electric frying pan and cook over a medium heat

If you give this recipe a try please let me know how it turns out, I’m happy to troubleshoot or discuss how you could substitute these ingredients if some of the ones I’ve used aren’t suitable to your family’s sensitivities. For example, if your family doesn’t tolerate rice, then other flours could be tried, such as: millet, sorghum or quinoa. If the arrowroot isn’t suitable, another starchy flour is potato.